Custom Interceptor 기반 캐싱을 통해 조회 성능 높히기
NestJS Interceptor를 활용한 Redis 캐싱 전략으로 API 응답 속도를 70배 향상시키는 방법
Carefreelife98
5분 소요
Interceptor 란?
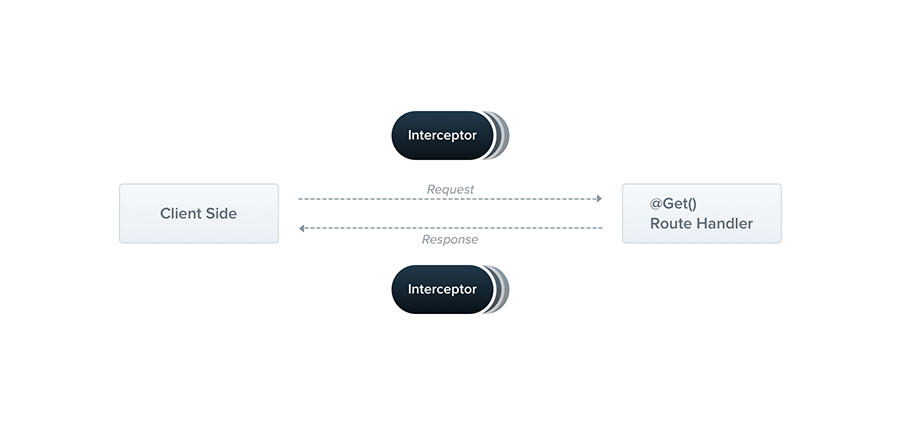
대량의 계층형 데이터를 반환하는 API의 응답 속도를 높히기 위해 Nest.js 에서 제공하는 Interceptor 를 사용하여 더욱 편리하게 API Endpoint 별 Redis 캐싱을 수행하도록 한다.
Interceptor는NestInterceptor인터페이스를 구현하며@Injectable()데코레이터가 적용된NestJS의 클래스이다.AOP (Aspect Oriented Programming)기술로부터 영감을 얻은 아래와 같은 기능들을 가지고 있다.- Method 실행 전/후 간의 부가 로직 수행 기능 제공 (전/후처리)
- 함수(function) 수행 결과 및 Exception 반환 형태의 변환 (Transform)
- 기본 함수의 동작 확장
- 특정한 목적을 위해 함수를 완벽히 Override (대체) 가능 (캐싱 등)
- 캐싱: 요청이 들어왔을 때, 인터셉터가 캐시된 결과가 존재하는지 먼저 확인. 만약 캐시된 결과가 있다면, 실제 비즈니스 로직을 실행하지 않고 캐시된 데이터를 바로 반환.
Interceptor 기초
모든 Interceptor 들은 아래와 같은 두 개의 인자를 가지는 intercept() 메서드를 구현해야 한다.
1. ExecutionContext
ArgumentsHost 를 상속받음. (적절한 인자를 사용하기 위한 HTTP / RPC / WebSockets 의 구분을 제공.)
- 공식 문서: ArgumentsHost
- 공식 문서: ExecutionContext
2. CallHandler
인터셉터가 특정 시점에 RouteHandler 를 불러오도록 사용할 수 있는 handle() 메서드를 구현.
handle()메서드가Observable을 반환하기 때문에RxJS의 강력한 연산자를 통해 이후 응답을 처리할 수 있다.
Interceptor 전처리 / 후처리 예시
1import { Injectable, NestInterceptor, ExecutionContext, CallHandler } from '@nestjs/common';2import { Observable } from 'rxjs';3import { tap } from 'rxjs/operators';4
5@Injectable()6export class CarefreeInterceptor implements NestInterceptor {7  intercept(context: ExecutionContext, next: CallHandler): Observable<any> {8    console.log('Before...'); // 요청에 대한 전처리9
10 const now = Date.now();11 return next12 .handle()13 .pipe(14 tap(() => console.log(`After... ${Date.now() - now}ms`)),15 );16 }17}1@Controller('/build')2@UseInterceptors(CarefreeInterceptor)3export class CarefreeLife {4 @Post()5 build() {6 console.log('Build CarefreeLife!');7 }8}수행 결과:
1Before...2Build CarefreeLife!3After... 1ms캐싱 로직이 필요했던 이유
변동성이 적은 대규모 계층형 트리 데이터를 주로 조회해오는 서비스를 개발하는 과정에서 매 조회 시마다 DB 쿼리를 수행하는 것은리소스 낭비라는 판단을 내렸다.- 쿼리 뿐만 아니라, 전체 데이터를 Closure Table 기반으로 구현된 계층형 트리 리스트로 가공하는 과정에서 다양한 부가 정보들이 삽입되는데, 해당 가공 로직 또한 매 조회 시 마다 수행하는 것은 불필요하다는 판단을 내렸다.
- 따라서 해당 데이터를 각 API Endpoint 및 쿼리 파라미터의 조합을 기준으로
Redis 에 캐싱하여 조회 성능을 극대화하는 방향으로 결정했다.
왜 Custom Interceptor 를 구현하여 캐싱을 수행했는가?
- Interceptor 를 사용하는 경우,
Request stream 을 통해 컨트롤러에 전달되기 전에 전처리를 수행할 수 있어 내부 로직 진입 전에 캐시 여부를 확인하여 즉시 반환 할 수 있기 때문에 현 상황에서 가장 효율적이라는 판단을 내렸다. - 캐시가 존재하지 않는다면, Interceptor 를 통해 반환된
Observable 을 사용해 후처리를 수행하여, Database 및 서비스를 거쳐 가공된 Response 를 캐싱하는것에도 가장 이상적인 방향이라고 생각했다. - 또한 캐싱 로직을 특정 서비스만을 위한 내부 로직으로 구현하지 않고
Custom Interceptor 기반의 공통 유틸로서 구현해놓는다면, 해당 프로젝트의 모든 서비스에서 편리하게 API 별 캐싱을 수행할 수 있게 되어확장 가능한 범용 소스가 될 수 있기 때문이었다.
RedisInterceptor 구현
1import { CallHandler, ExecutionContext, Injectable, Logger, NestInterceptor } from '@nestjs/common';2import { catchError, Observable, of } from 'rxjs';3import { RedisCacheService } from '../cache/redis.cache.service';4import { tap } from 'rxjs/operators';5import { instanceToPlain } from 'class-transformer';6import { ConfigService } from '@nestjs/config';7
8@Injectable()9export class RedisInterceptor implements NestInterceptor {10    constructor(11        private readonly redisService: RedisCacheService,12        private readonly configService: ConfigService,13    ) {}14    private readonly logger = new Logger('RedisInterceptor');15
16    async intercept(context: ExecutionContext, next: CallHandler): Promise<Observable<any>> {17        const prefix = this.configService.get<string>('REDIS_INTERCEPTOR_CACHE_PREFIX');18        const ttl = this.configService.get<number>('REDIS_INTERCEPTOR_CACHE_TTL');19        const key = RedisInterceptor.generateCacheKeyByHostType(context, prefix);20
21        const cachedResponse = await this.redisService.get(key);22        if (cachedResponse) {23            return of(cachedResponse);24        }25
26        return next.handle().pipe(27            tap(async (response) => {28                const safeResponse = instanceToPlain(response);29                await this.redisService.set(key, JSON.stringify(safeResponse), ttl);30            }),31            catchError((error) => {32                this.logger.error(`Error ::: RedisInterceptor ::: message [${error.message}]`, { stack: error.stack });33                throw Error(error);34            }),35        );36    }37
38    static generateCacheKeyByHostType(ctx: ExecutionContext, prefix: string): string {39        const hostType = ctx.getType();40
41        if (hostType === 'http') {42            const request = ctx.switchToHttp().getRequest<Request>();43            prefix += encodeURIComponent(request.url);44        }45
46        return prefix;47    }48}
intercept() 메서드 설명
1async intercept(context: ExecutionContext, next: CallHandler): Promise<Observable<any>> {2  // 전처리 과정 - 캐시가 존재하는 경우 캐시데이터 반환3  const prefix = this.configService.get<string>('REDIS_INTERCEPTOR_CACHE_PREFIX');4  const ttl = this.configService.get<number>('REDIS_INTERCEPTOR_CACHE_TTL');5  const key = RedisInterceptor.generateCacheKeyByHostType(context, prefix);6
7  const cachedResponse = await this.redisService.get(key);8  if (cachedResponse) {9    return of(cachedResponse);10  }11
12  // 후처리 과정 - 캐시가 존재하지 않는 경우 response 데이터를 Redis 에 캐싱13  return next.handle().pipe(14    tap(async (response) => {15      const safeResponse = instanceToPlain(response);16      await this.redisService.set(key, JSON.stringify(safeResponse), ttl);17    }),18    catchError((error) => {19      this.logger.error(`Error ::: RedisInterceptor ::: message [${error.message}]`, { stack: error.stack });20      throw Error(error);21    }),22  );23}
Custom Interceptor 사용 예시 및 결과
사용 예시
1import { Controller, UseInterceptors, BadRequestException } from '@nestjs/common';2import { RedisInterceptor } from '../../common/interceptor/redis.interceptor';3import { CarefreeService } from './carefree.service';4
5@UseInterceptors(RedisInterceptor)6@Controller('care')7export class CarefreeController {8  constructor(private readonly carefreeService: CarefreeService) {}9
10  @Get('free')11  public async find(@Query('free') free: string): Promise<FreeDto> {12    if (!free) throw new BadRequestException({}, 'carefree 가 확인되지 않았습니다.');13
14    const response = await this.carefreeService.findFree(free);15    return FreeDto.of({ data: response });16  }17
18  @Get('life')19  public async findLife(@Query('life') life: string): Promise<LifeDto> {20    if (!life) throw new BadRequestException({}, 'life 가 확인되지 않았습니다.');21
22    const response = await this.carefreeService.generateLife(life);23    return LifeDto.of({ data: response });24  }25}
결과

- Winston 기반 로깅 Interceptor 를 통해 각 API 호출 별 실행 시간 또한 로깅하고 있다.
209ms정도 소요되던 API Response time 이3ms정도로 약 70배 감소된 것을 확인 할 수 있다.